Make a Course Avaiable Again on My Courses
For the by four years, I accept been packaging up my knowledge and selling information technology via courses here on this website. Literally, anyone can do it!
Some people choose to go with a SaaS-based solution like Teachable, Podia, or Kajabi, which are all great services only with a high monthly price tag.
Still, information technology's quite like shooting fish in a barrel to create an online form website where yous can sell and deliver your knowledge in a beautiful mode.
For this tutorial you are going to need a few things:
- Website hosting. I recommend Siteground
- WordPress (of course), It's complimentary
- WordPress Theme, Astra it's free also
- LearnDash, The industry-leading learning management system for WordPress
In this tutorial, we're going to cover how to create an online course website from start to finish including the post-obit:
- Things You Need to Create an Online Form Website
- Step 1. Purchasing website hosting and domain name.
- Step 2. Install and gear up up LearnDash.
- Pace 3. Install your WordPress theme and page architect.
- Stride 4. Create your kickoff course with LearnDash.
- Step 5. Add sections and lessons to your form.
- Step half-dozen. Suspension your lessons into smaller topics.
- Pace vii. Adding quizzes to your grade.
- Step eight. Adding assignments to your lessons
- Step 9. Connect a form to a sales funnel
- Wrapping Up
Things Y'all Demand to Create an Online Class Website
To create a beautiful online course website, you're going to need a scattering of tools. Some of these are free, some are non. Merely the cost is minimal compared to what you may earn in selling your knowledge through your courses.
one. A skillful website hosting and domain name.
Since you lot're hosting your courses on your own website, yous'll demand to buy a good website hosting that's reliable, fast, and offers keen support. You'll as well demand a domain name which is basically your website's accost.
There are quite a lot of hosting out there, only for me the best 1 is Siteground. In my years of using it, it'southward been fast, reliable, and the client support is amazing. My websites that are hosted on Siteground are always upwards and running. And if I see whatsoever consequence, their team is quick to assist. So in this tutorial, nosotros're going to employ Siteground.
If you want to save 70% on your hosting with Siteground, click hither to save 🙂
2. WordPress.
Pretty obvious since you are afterwards all going to build your website through WordPress. The main advantage of using WordPress over other SaaS-based solutions is y'all go full command over your data and blueprint.
WordPress has a vast community of plugins and themes that volition add any functionality that y'all desire. If y'all can think it, there'southward a plugin for information technology. And almost everyday developers ringlet out new plugins and themes, so really in that location's no limit to what you can do with WordPress.
WordPress is really easy to install and set. Siteground comes with a one-click WordPress installer that we're going to talk about later.
3. A WordPress theme and a page builder.
Yous'll also need a WordPress theme that's easy to work with. I really like using Astra since it's complimentary, well-coded, and works well with most plugins like page builders and course builders.
Folio builders are WordPress plugins that let you build webpages by simply dragging and dropping elements similar images and texts. They're super easy to use and eliminates the demand to hire expensive spider web developers to create stunning websites.
For the purposes of this tutorial, we're going to use Elementor Pro as the page builder. Personally, Elementor Pro has exceeded my expectations when it comes to page builders. It'due south intuitive, very piece of cake to utilize, and packs a lot of advanced features that will really add flavor to your website.
4. A learning management system plugin to plough your website into an online course website.
Lastly, you'll need a powerful learning management organization (LMS) WordPress plugin to turn your website into a beautiful course website where you can sell your content, keep rails of student progress, accolade certificates, and more.
By far the leading LMS plugin in WordPress is LearnDash. It'due south easily down the well-nigh powerful, cutting-border course builder software I've come across with, and I am in fact switching to LearnDash from another LMS because of its recent updates that are but hard to ignore.
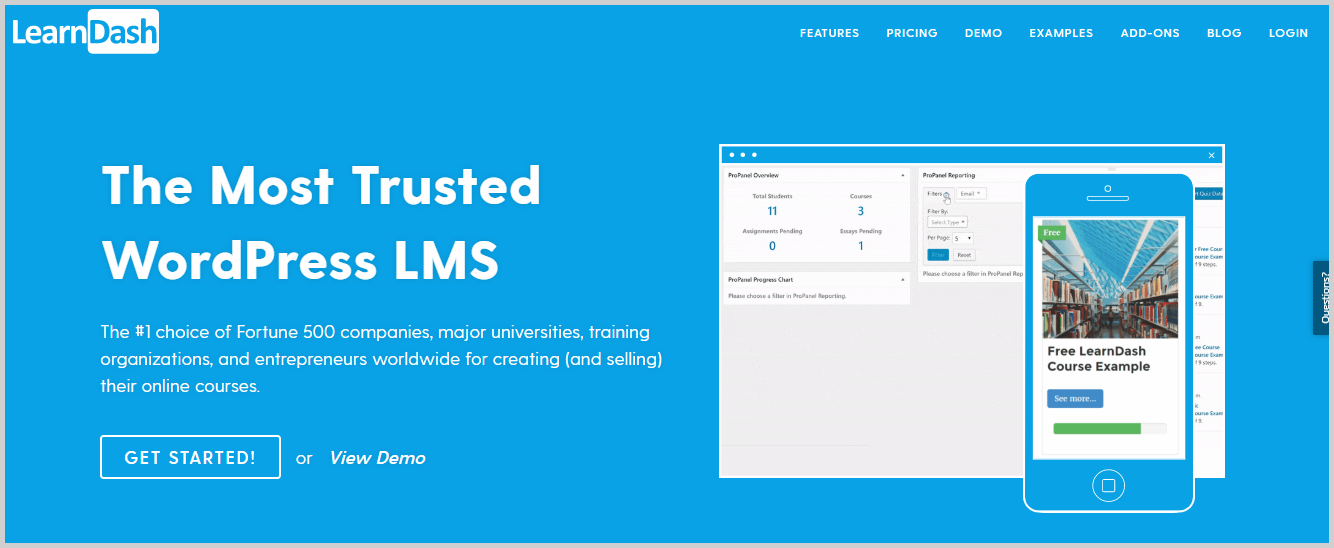
With the recently released LearnDash three.0, in that location's a ton of new features that enhance user experience and overall only make grade websites wait better and experience more than professional.
LearnDash is used by thousands of universities, reputable online marketing agencies, and organizations which is a lot to say about its reliability.
I highly recommend that yous effort LearnDash right at present. Information technology's fairly affordable, virtually too affordable, for all the features you lot'll get. If you're not happy with it for some reason, you can utilise their 30-24-hour interval moneyback guarantee.Step 1. Purchasing website hosting and domain name.
The first pace is buying a website hosting and domain proper noun. If you lot're new to creating websites and not really familiar with manufacture terms, the website hosting is similar the house of your website. It'southward a space on the internet where your website resides.
The domain name, on the other paw, is the address. It's what people blazon into the search bar to look for your website. Examples of domain names are WPCrafter.com, Facebook.com, Wikipedia.org, then on. The ".com" and ".org" are kinds of domain extensions.
There are tons of other domain extensions like .gov, .net, .us, .co, etc., and what you choose depends on your preference and the type of your organization. If you're a private business organisation, .com should work. For most educational institutions, .org is the preferred domain extension.
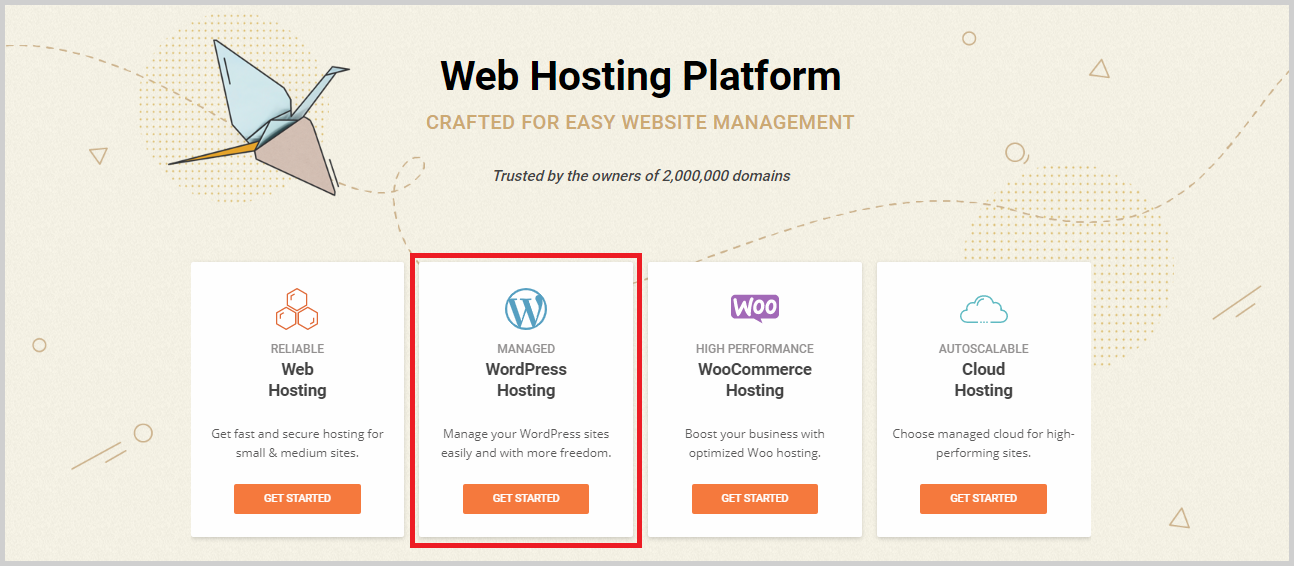
Like I said before, I highly recommend using Siteground as it provides loftier-quality hosting and amazing back up. To purchase hosting from Siteground with 70% off, visit Siteground by clicking on this link.
On the homepage, y'all should see dissimilar kinds of hosting. WordPress hosting is a good 1, so click on Get Started right beneath it.
You'll and then exist taken to a page with the pricing plans of WordPress hosting by Siteground.
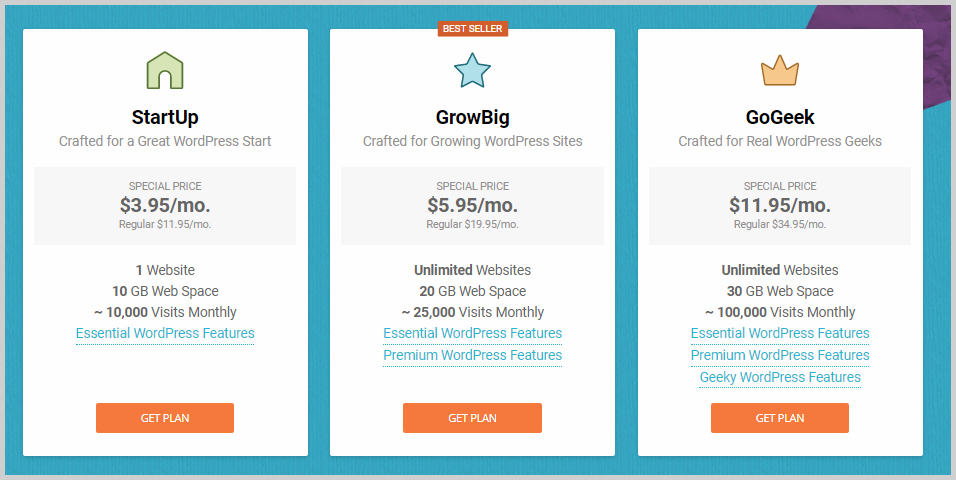
Choose the programme that y'all adopt depending on your needs. GrowBig is a great program because you'll be able to host an unlimited number of websites and besides get some premium features. One of these features is the ability to test new codes and features on a test website and pushing the final changes on your live website with one click. Information technology also comes with an advanced caching plugin developed by the aforementioned team and a free website transfer for one website.
In this tutorial, I'1000 going to become alee and purchase GrowBig. Yous tin can choose your own plan and click Get Plan.
You'll then be taken to the next pace which is choosing your domain name. It's easier to purchase your domain proper name right within Siteground, but if you already have one, you lot can just choose "I already accept a Domain" and type that into the domain name box. You can besides purchase your domain name on a split up website but that's going to take extra steps to integrate with your hosting on Siteground.
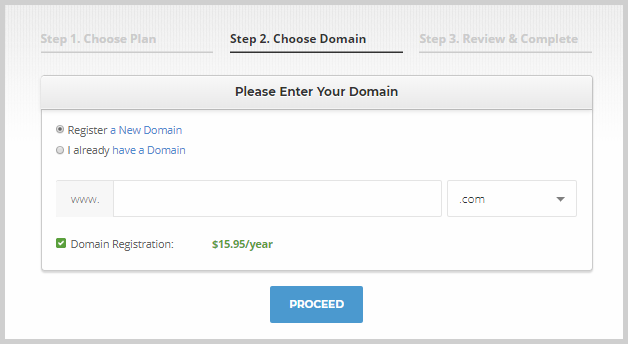
Once you lot have your desired domain proper name, click Go on and complete your checkout.
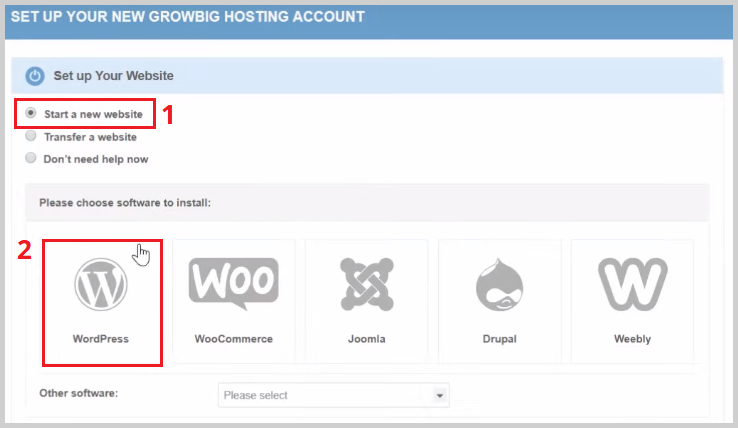
Once you made your buy, you lot'll see a screen with a link saying "Keep to Client Area". Click on that and yous'll be taken to a page where you tin can set up your new hosting business relationship. Under Fix Your Website, select Start a new website.
You will then see a list of software that you can install. Select WordPress.
You'll then be asked to provide admin login details like your username and password. These are your website security details so be sure to utilize details that are non piece of cake to gauge.
Once that's done, click Ostend > Consummate Setup. And you now accept a live, self-hosted WordPress website.
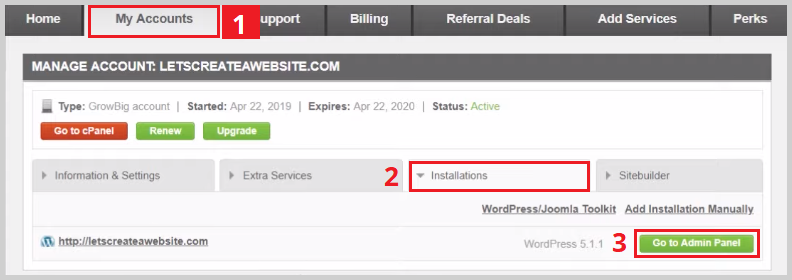
To customize your website, you'll need to log in to WordPress. To do that, go to your Siteground dashboard and switch to the My Accounts tab. Click the Installation tab, and here y'all will see the domain name that yous registered. Across it is a dark-green Get to Admin Portal button. Click on this button to go to your WordPress login page.
The WordPress login page looks similar this:
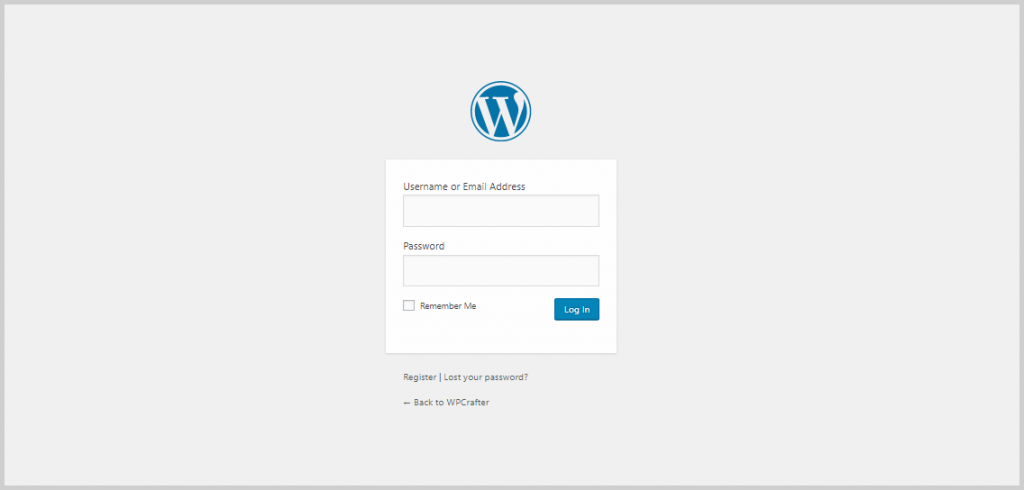
Enter your username and password here to log in to your website for the kickoff time.
Step two. Install and gear up upwardly LearnDash.
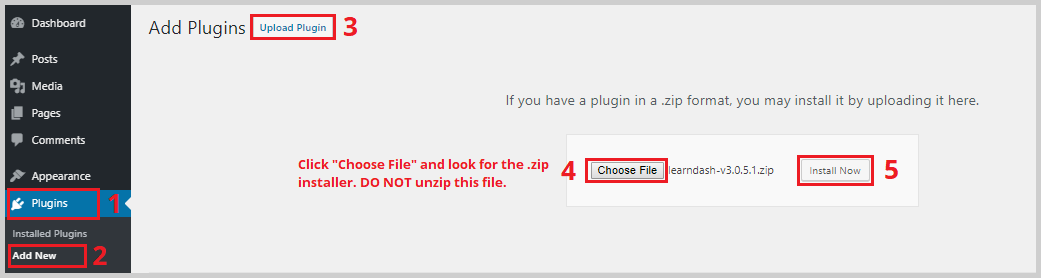
In one case you lot're inside WordPress, it's time to install LearnDash. When you purchase LearnDash, yous'll get admission to the installer (a .null file) and license key. To install LearnDash, upload the .zip installer to WordPress by going to Appearance > Plugins > Add New > Upload Plugin.
In one case information technology's done installing, click Actuate.
Now you accept LearnDash installed and activated on WordPress. The first thing you lot demand to do is activate the license by going to LearnDash > Settings. Switch to the LMS License tab to enter your electronic mail accost and license primal. One time you've entered the details, click Update License.
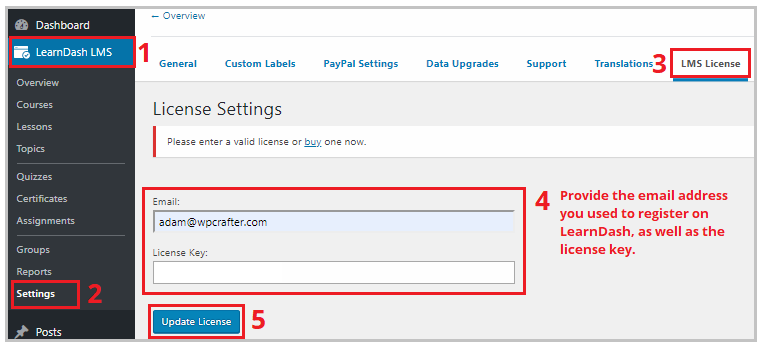
And then y'all demand to configure your payment settings if you want to receive online payments for your class. Click the PayPal Settings tab and input your PayPal email accost, currency, country, and then on. Click Relieve once you're washed.

LearnDash 3.0
Another thing you need to do is to make sure that you're using LearnDash iii.0 instead of Legacy. To do this, switch to the General tab. Here, you'll see the option to cull an Agile Template. Brand certain that LearnDash 3.0 is selected instead of Legacy to gain access to advanced features similar the Focus Manner.
The Focus Way is applied site-wide and provides a lark-free feel to your students by removing unnecessary elements on a page similar sidebars and other widgets. This also makes it easier for you to create a beautiful, professional-looking class website without having to go in and edit your pages 1 past one.
Here's how a website changes one time the Focus Mode is enabled:

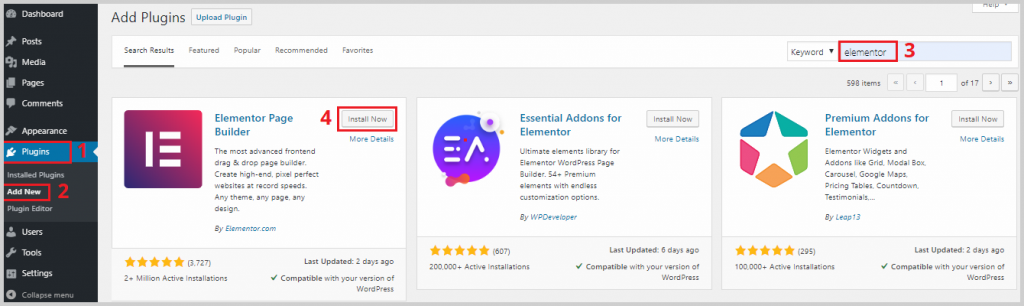
Step 3. Install your WordPress theme and page builder.
Subsequently installing LearnDash, you tin go on with creating a course, but in this tutorial, I want to show you lot a slightly different way of doing things that will make information technology even faster and easier for y'all to create a cute online class website.
For that, nosotros'll need the Astra Theme and Elementor.
To install Elementor, go to Plugin > Add New, and search for Elementor. Click Install and Activate.
To install Astra Theme, become to Appearance > Theme > Add New. Search for Astra, click Install, and Activate.
In one case Astra is activated, you'll run into a message like this on your dashboard:
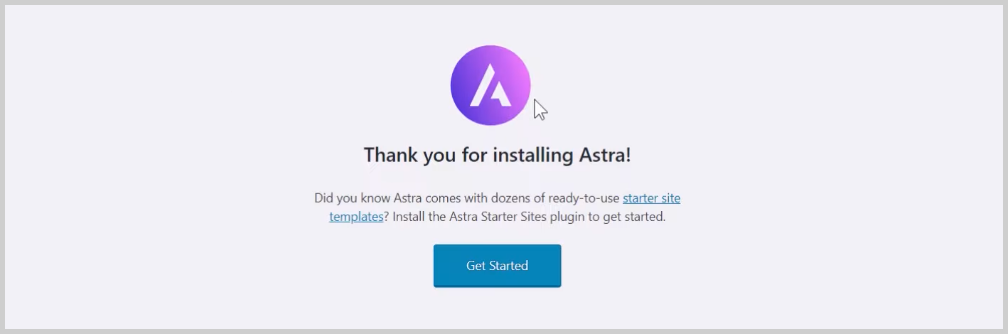
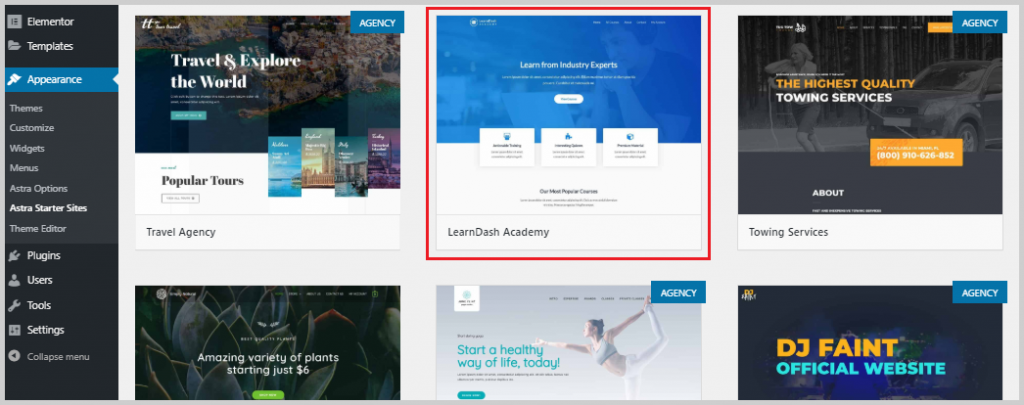
Astra has a collection of set up-made site templates that yous can employ on your website in merely a few clicks. To run into these templates, click Get Started. You'll be asked to choose a page architect, and I recommend selecting Elementor for this, but yous can use whatsoever other page architect that yous prefer. When you click Next, you lot'll encounter a list of free and premium site templates that you can employ for your own website.
There'south a particular template that I similar using with LearnDash considering information technology's designed for an online class website. If yous scroll down the templates, you'll the LearnDash Academy template. Of course, you can use templates other than this, simply for this tutorial, I'm going to utilise this template.
Clicking it will take me to a preview of the template, and in information technology, I meet that the template requires 2 plugins: LearnDash Class Filigree and LearnDash WooCommerce Integration. These are FREE LearnDash add together-ons that y'all can rapidly install past going to LearnDash > Addons.
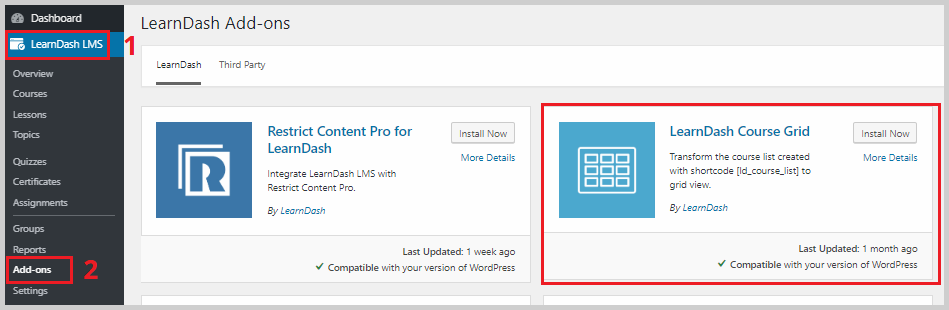
Wait for LearnDash Course Grid and LearnDash WooCommerce and install and activate each.
You can now go back to the Astra template preview and striking refresh. This is what you should see:
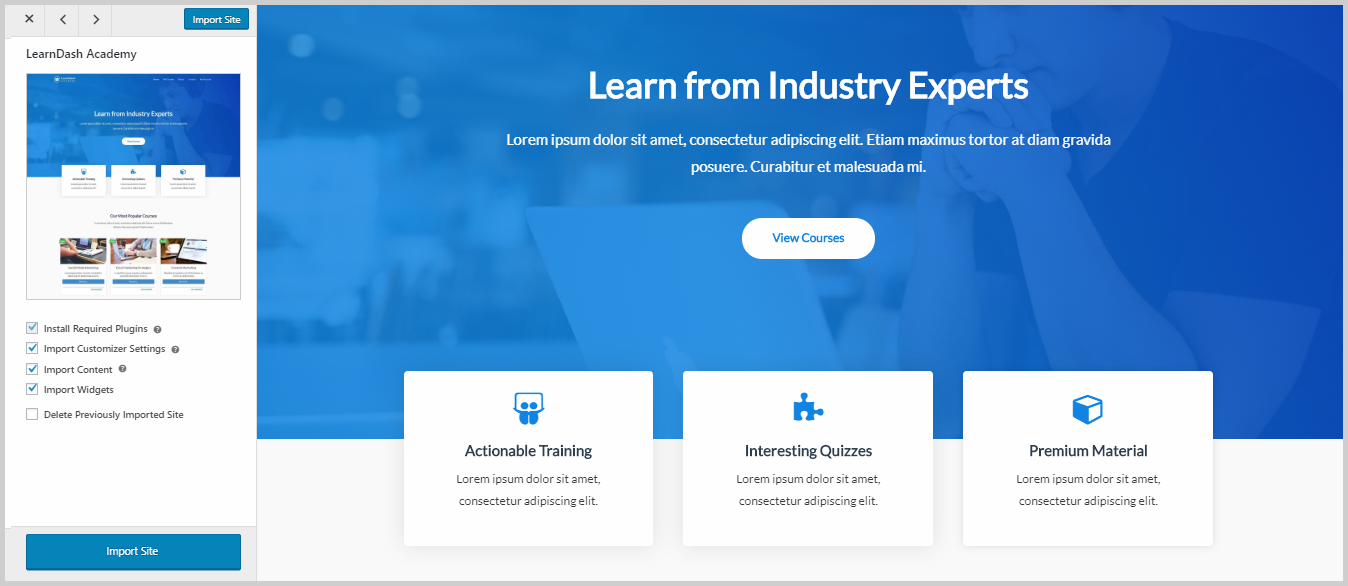
It's a really beautiful website that's specially fabricated for offering online courses. Click Import Site to use this template on your website.
This template is fully editable in Elementor, so yous tin edit the colors, texts, typography, images, and icons to friction match your brand.
If you're not familiar with using Elementor, you can lookout this tutorial of mine on how to use Elementor.
Step 4. Create your first course with LearnDash.
At present that the frontend of your website looks amazing, information technology'south time to add together your content or courses. Some of you might exist thinking that creating courses with LearnDash must be difficult and complicated because it's that way with almost LMS out at that place.
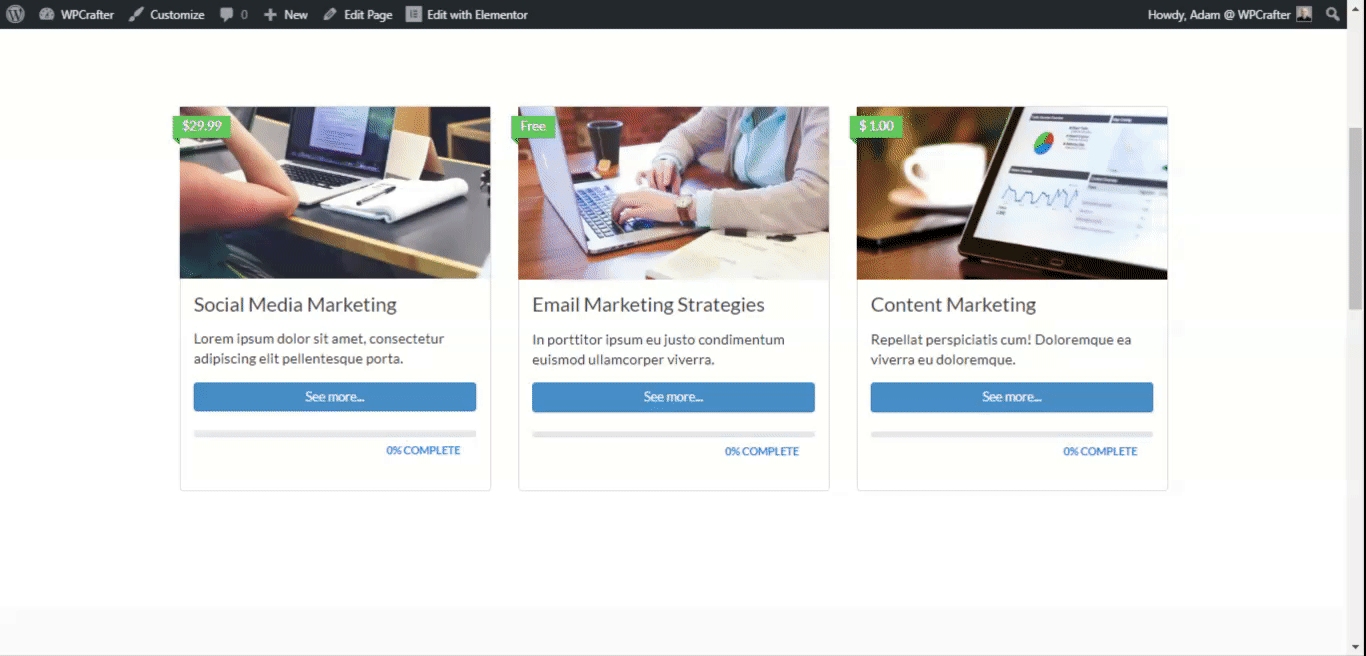
But LearnDash recently pushed out an amazing course architect that makes course cosmos as simple as dragging and dropping lessons and topics. The LearnDash Academy template that nosotros used for this website also imports sample courses that are displayed on the All Courses page. Here'south how they look similar:
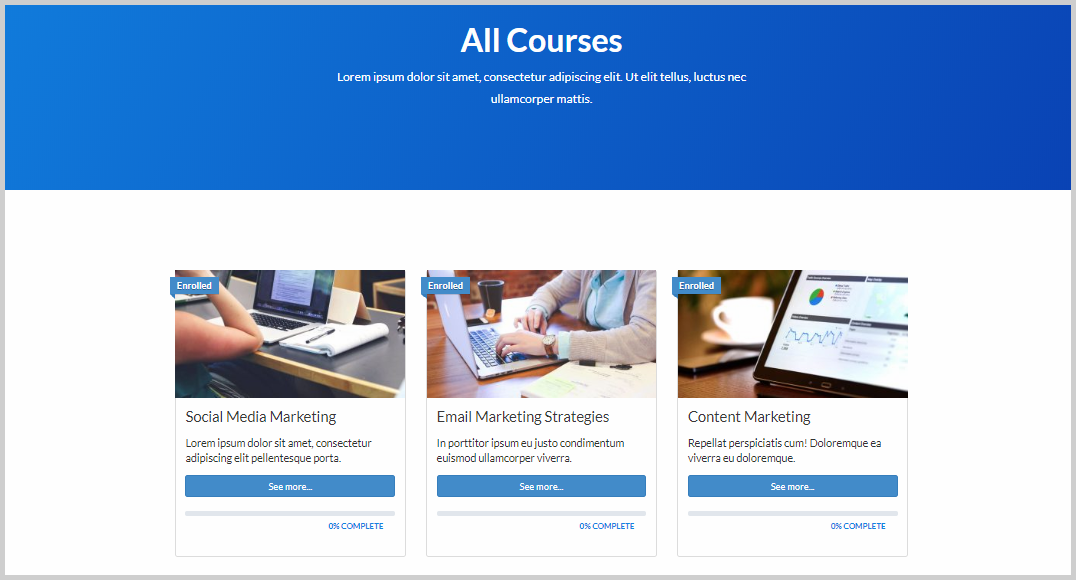
Yous'll see that each form has a featured paradigm, title, brusk clarification, a progress bar and pct, and an Enrolled label. All these tin be configured inside LearnDash.
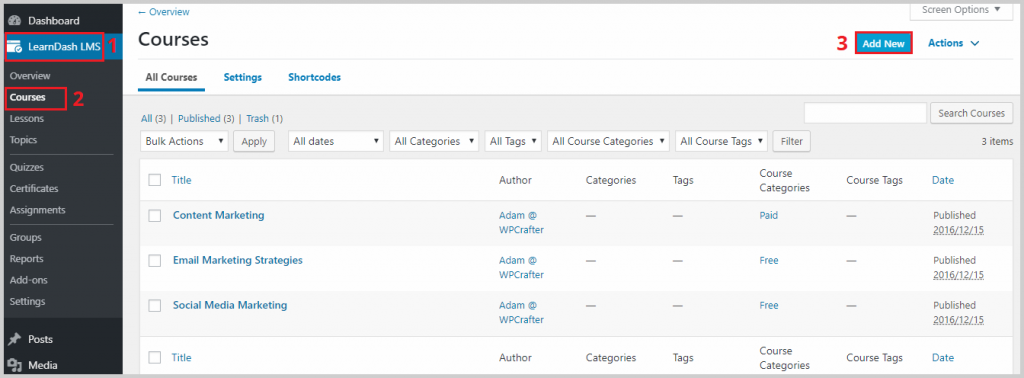
If yous go to LearnDash > Courses, you'll meet a list of all the courses on your website. You can edit the imported courses by clicking on their titles, or you can create a new course from scratch. To create a new course, click Add New.
You lot'll then be taken inside the course editor. Give your course a title and add together a short description. You can also add a featured image.
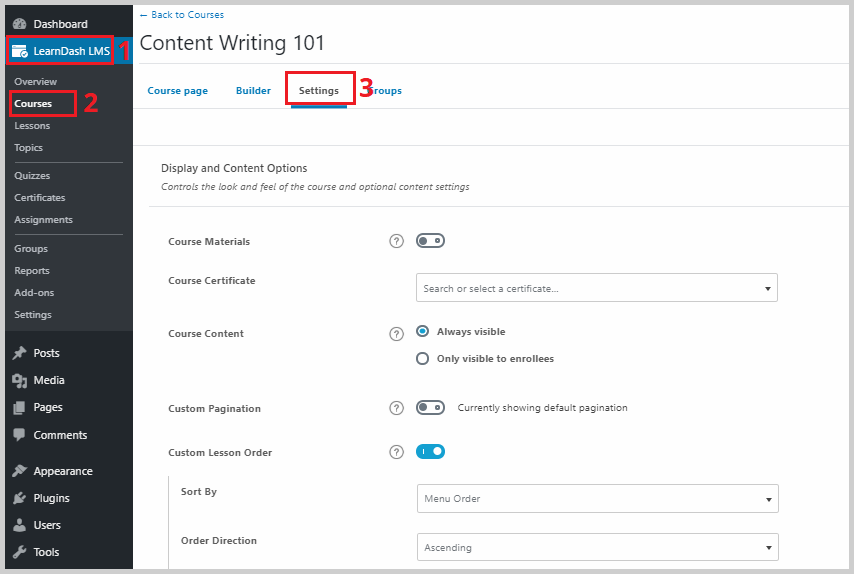
Then switch to the Settings tab to configure the settings of the grade. In this tab, you'll be able to add course materials, assign a class certificate, assign grade prerequisites, etc.
If yous scroll downwardly, y'all'll also be able to fix who gets access to your course. It tin can be open to anybody, even not-registered users on your site, it can be freely accessible to registered members, or it can be bought for a quondam or recurring fee, and more.

If you lot click Buy now, you'll be able to set up the course cost. As for the Recurring option, y'all'll be able to set the course price as well equally the billing bicycle. The Closed option is best used when you desire your course to be bachelor inside a customized sales funnel which we'll talk about later.
Step five. Add together sections and lessons to your class.
In one case yous're done setting up the course, switch to the Architect tab at the peak to kickoff creating an outline for your course. If all yous accept is an outline, that'due south fine because you lot can become back in later and add content to your lessons.
You can outset by adding department headings by clicking New Department Heading. You can't add content to section since they're just a way to organize the menstruum of your form, much like a chapter title in a volume.
Then y'all can add a new lesson by clicking New Lesson. Y'all tin can add together as many lessons as yous want and rearrange them by dragging and dropping or by clicking the fiddling up and down buttons on the side.
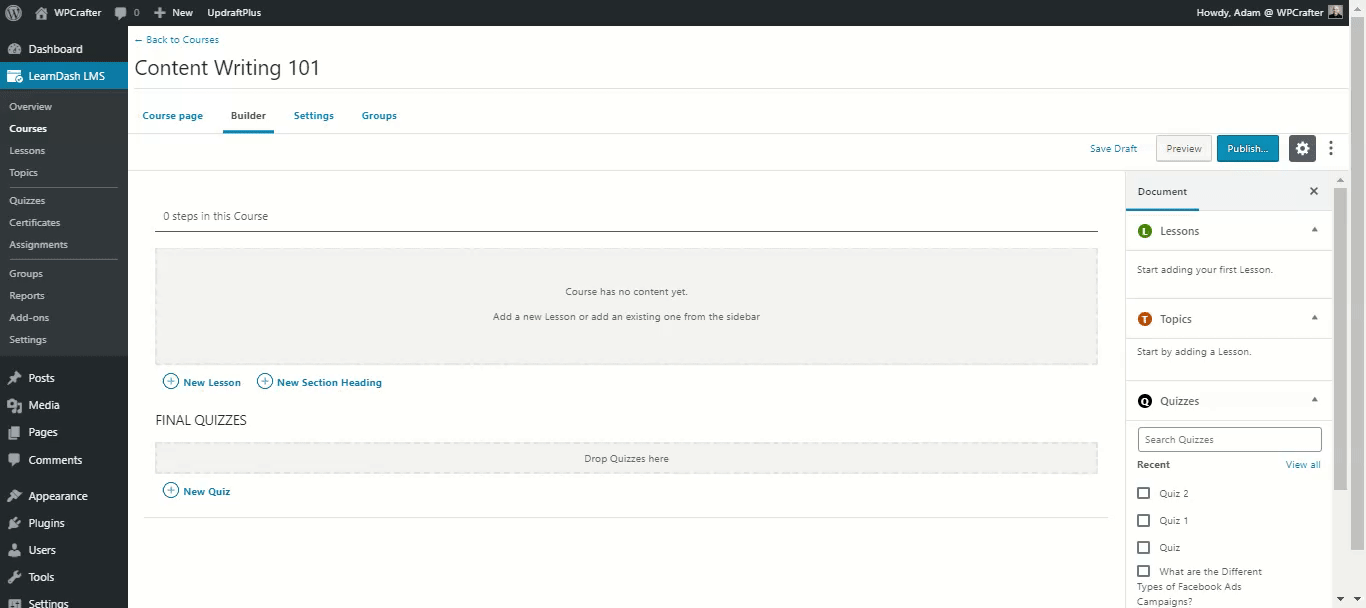
Another method to create a new lesson is going to LearnDash > Lessons > Add New.
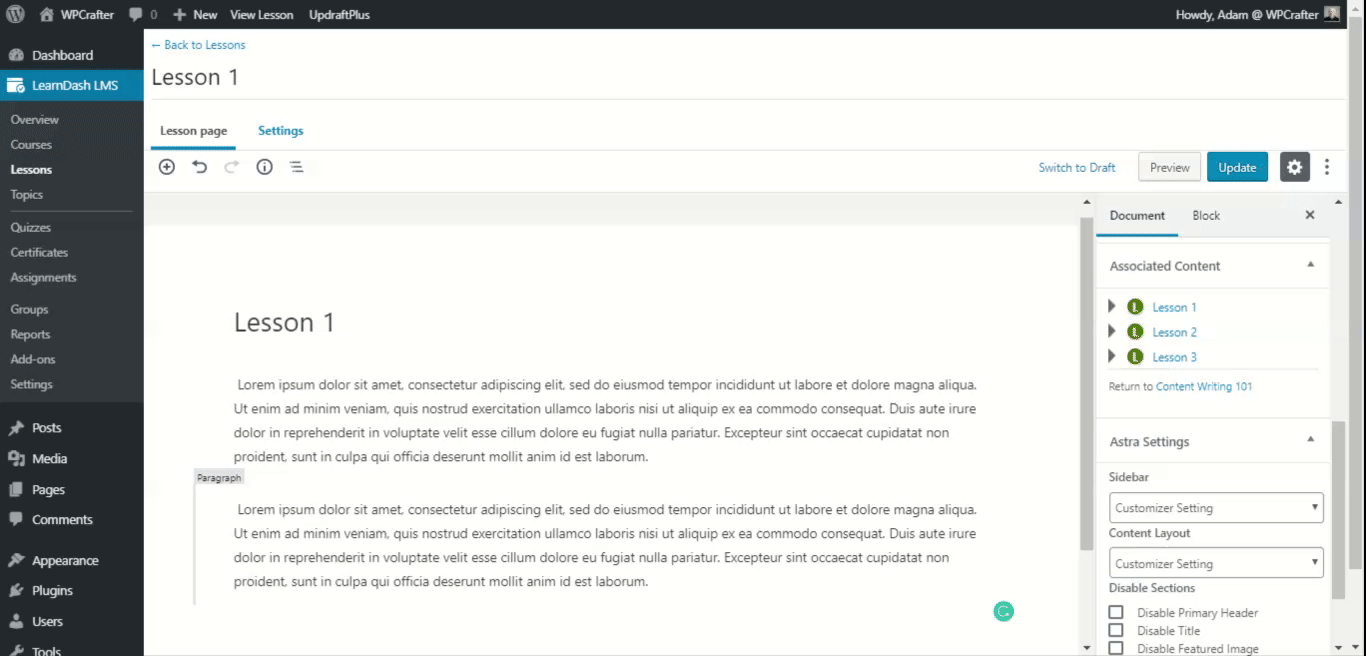
The adjacent step would be to add content to each lesson. When inside the class builder, y'all tin can do this by hovering your mouse over the lesson that you lot desire to edit and clicking Edit.
You'll exist taken inside the lesson editor where you lot tin add together text, images, videos, and more. You lot'll be able to customize the lesson page however y'all want and add as much content equally you want.
Once you're done with the content, click Settings at the top to further customize your lesson. Here'due south where yous can add lesson materials, enable video progression (if your courses are in video format), allow students to upload assignments, assign the lesson to a specific course, and besides configure the lesson admission settings.
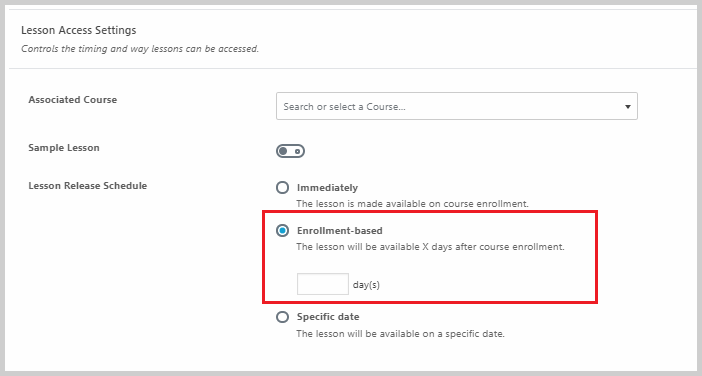
If you lot curlicue down the folio, you'll encounter lesson access settings where you can associate your lesson to a specific grade.
You can also use LearnDash'due south baste-feed feature where you can control when your lessons are going to exist available to your students. If you select the Enrollment-based option, you lot can ready a specific number of days afterwards enrolment when the lesson is going to be available to your students.
Everything is done right inside LearnDash's class builder and then you tin just focus on creating courses that add value to your audition.
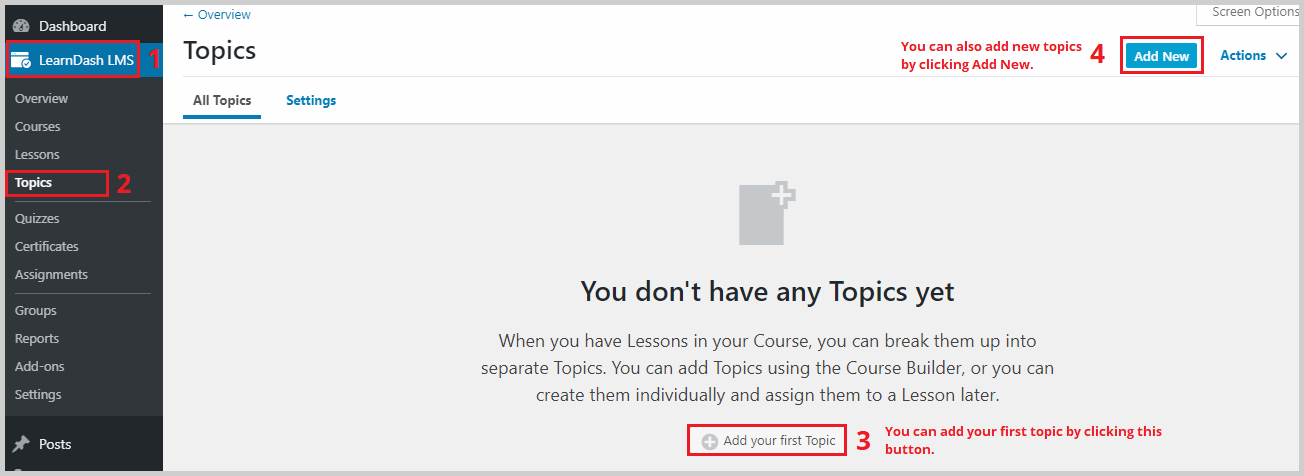
Step half dozen. Break your lessons into smaller topics.
If your lesson covers multiple topics so that it becomes too long, breaking information technology upward into smaller topics is a cracking way to avoid information overload for your students.
To add topics to a lesson, go to LearnDash > Topics > Add together your first topic. If it'due south not your first topic, click Add New.
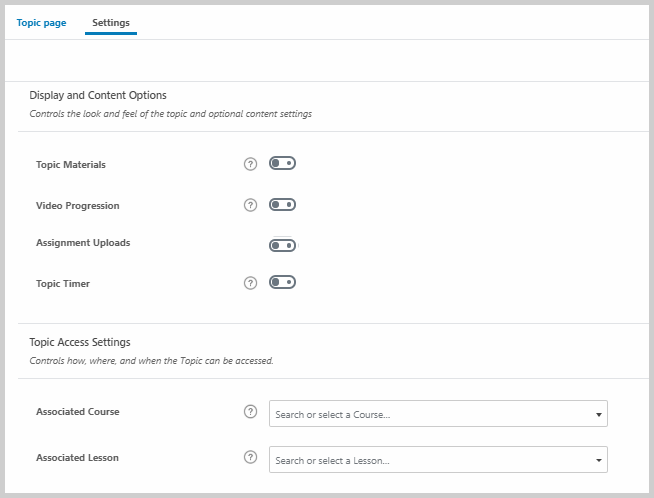
Only similar how you'll edit lessons, you can edit topics by calculation a title, a featured paradigm, and any other content like text, images, embedded video, and other media.
Clicking Settings volition take you to the settings folio of the topic. Here, yous tin can assign topic materials and enable options like video progression, assignment uploads, and timer.
You can as well assign the topic to a course and a lesson under the Topic Access Settings.
Step seven. Calculation quizzes to your course.
As a course creator, you might want to measure your students' progress through quizzes and assignments. LearnDash makes the procedure of creating quizzes and assignments and then simple yet complete with advanced features that will help y'all maximize each quiz and assignment you create.
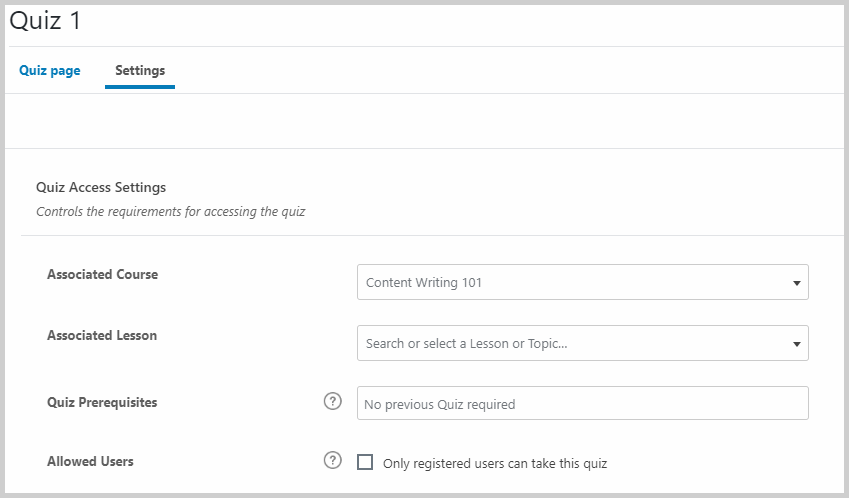
To add a new quiz, go to LearnDash > Quizzes > Add New. Just like with lessons and topics, give your quiz a title and a brusque clarification. Then click the Settings tab to configure its settings.
Under the Quiz Access Settings, you tin associate the quiz to a course and lesson, assign quiz prerequisites, and limit access to registered members.
Scroll down and you lot'll see the Quiz Progression and Restriction section where yous can prepare the passing score, assign a quiz certificate, restrict quiz retakes, require all questions to be completed, and even prepare a fourth dimension limit.
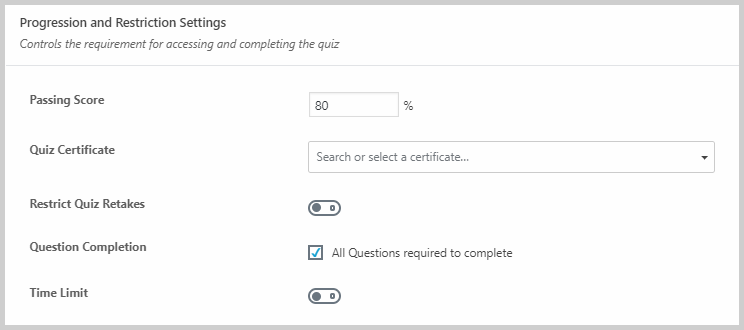
Scrolling downwardly will reveal fifty-fifty more settings like enabling quiz materials, enable the quiz to starting time automatically, choose how questions volition exist displayed, and so on. These settings are pretty advanced and will actually let you appraise your students the best mode possible. Once you're washed, click Update.
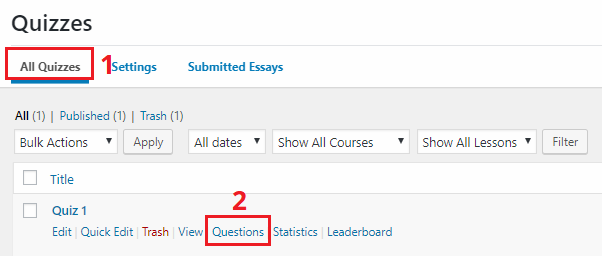
At present it's time to add questions to your quiz. To do that, go to LearnDash > Quizzes. Hover your mouse over the quiz that you want to add questions to and click Questions.
Y'all'll then be taken here:
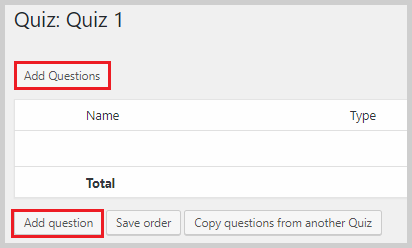
Click either of the Add Questions buttons and you'll exist taken to the question editor. Inside the question editor, you'll be able to add together the actual question, assign the number of points it is equivalent to, assign messages to display if the student correctly or incorrectly answers the question, then on.
Y'all'll also be able to select the respond type whether it'south a single choice, multiple choice, essay, fill in the blanks, etc. Clicking on an reply blazon will open a dropdown with additional settings specific to that answer type.

Step eight. Calculation assignments to your lessons.
Yous can likewise add together assignments to specific lessons past going to LearnDash > Lessons and editing the lesson that y'all want to add an assignment to. Once within the lesson editor, click the Settings tab.
You'll run across nether the Display and Content Options an option to enable Assignment Uploads. Enable this option. Yous'll then come across additional options like allowed file formats, file size limit, assigning the number of points for the assignment, and whether information technology will be graded automatically or manually.
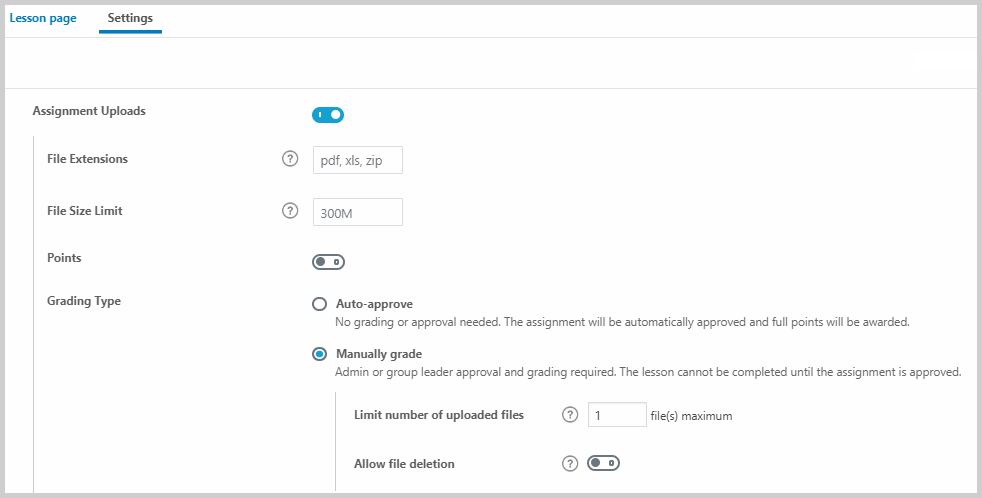
Don't forget to provide instructions for the assignment in your lesson. Click Update to save your changes.
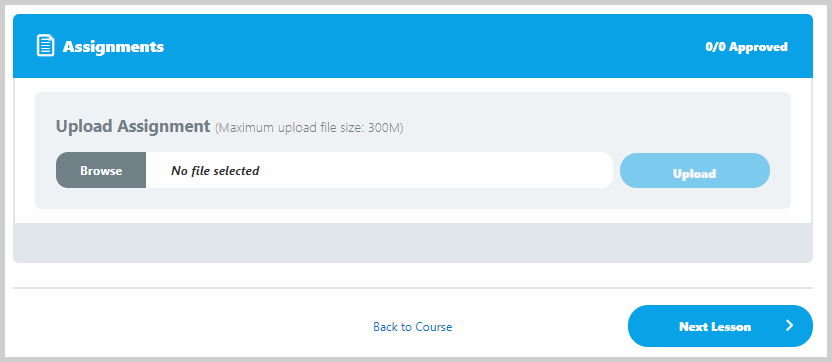
At the end of the lesson, students will meet an option to upload their assignments:
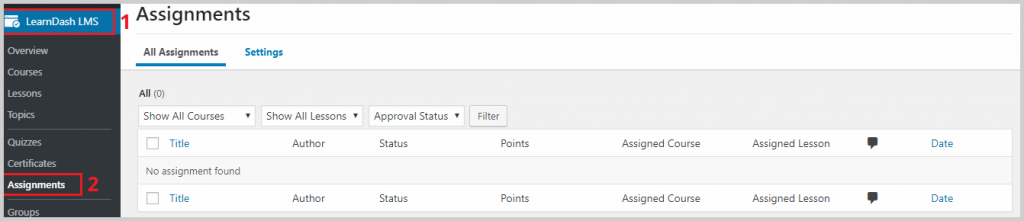
On the backend, you lot can view submitted assignments past going to LearnDash > Assignments.
Step 9. Connect a course to a sales funnel.
Earlier we saw that we tin set the Course Access Settings to Closed which is best used when a course is available inside a customized sales funnel.
To connect a course to a customized sales funnel, nosotros need to accept the following plugins installed:
- CartFlows
- WooCommerce
- LearnDash WooCommerce Integration
All of these plugins are free. While CartFlows has a premium version, the free version is enough to connect a course to a sales funnel.
If y'all take installed the LearnDash University template, all these three plugins will already be installed on your WordPress. Just you have to brand certain that they are activated by going to Plugins.
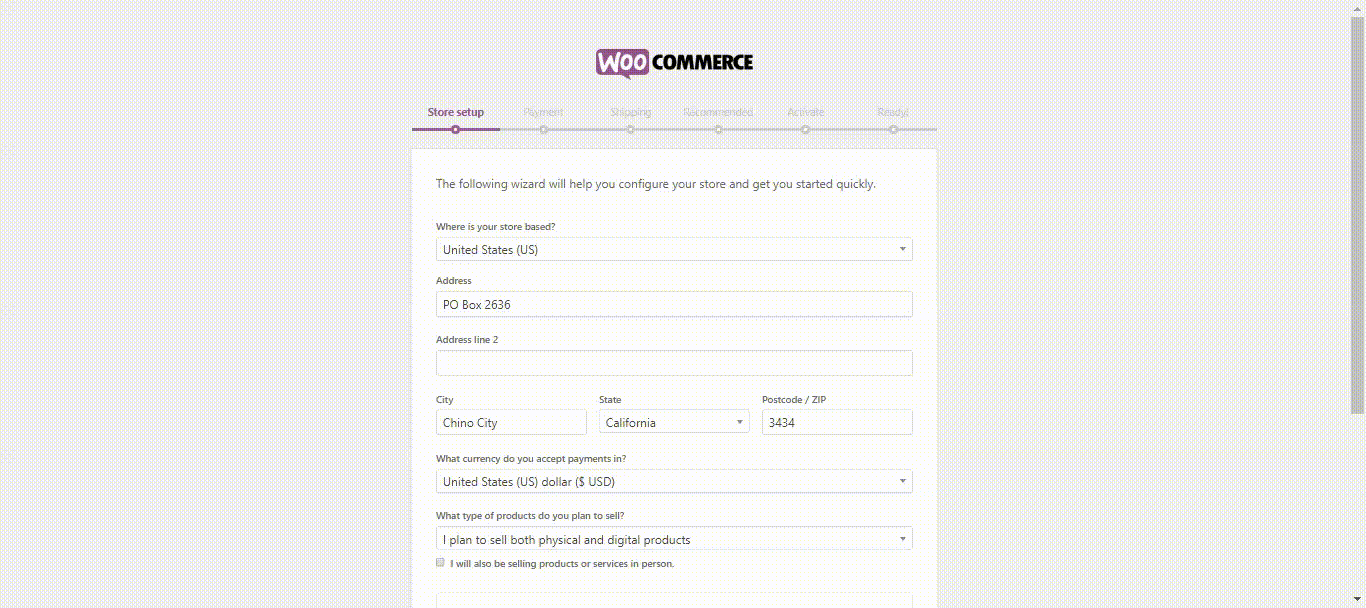
The showtime thing we have to do is run the WooCommerce setup sorcerer. When Woocommerce was installed, you may take noticed this message appear:
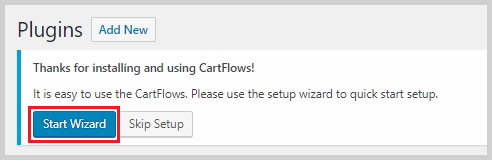
Click Run the Setup Wizard to enter the setup sorcerer. This is how the setup wizard works:
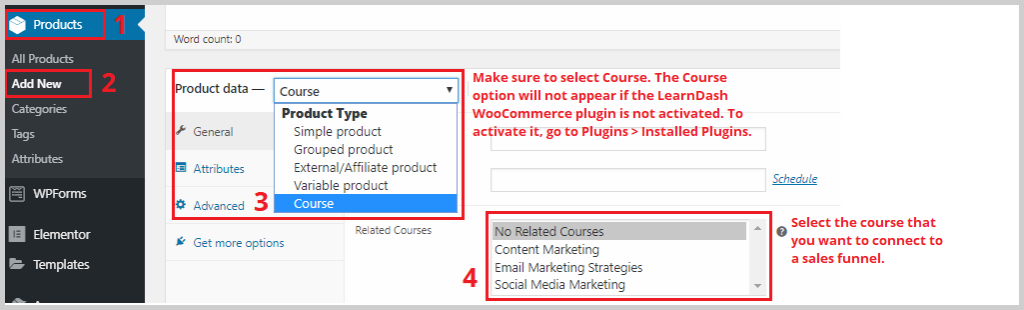
One time that'southward done, become back to the WordPress dashboard and add a new product by going to Products > Add New. Name your product the same every bit the course that y'all want to link to a sales funnel.
If you scroll downwardly, you'll come across an option to select Product Data. Select Form, and in the General tab, select the course that you want to connect it to in the Related Courses.
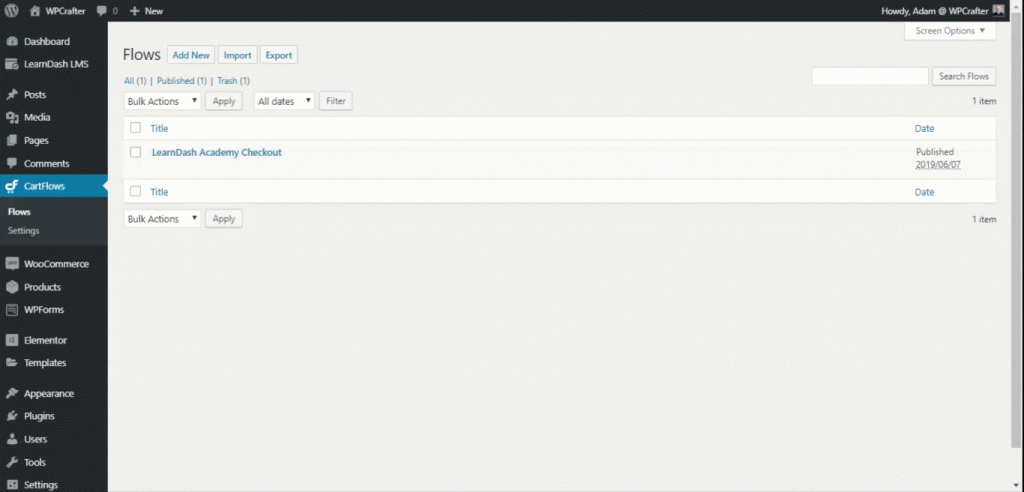
Once that's done, information technology'southward at present time to create a custom sales funnel. This is what CartFlows is for. It's a plugin that lets you create sales funnels right inside WordPress to enhance customers' checkout experience and ultimately increase your acquirement.
To create a sales funnel, go to CartFlows > Flows. The LearnDash University template already comes with a ready-made funnel/flow. Yous can choose to utilise that or you can create a flow from scratch.
If you want to create a period, click Add New. In that location you will see a library of funnel templates that are ready to apply and fully editable in Elementor. Select i that you lot like and click Import.
You'll so be taken inside the menstruation editor where you tin can give the menstruum a name and rearrange the steps by simple elevate and drop.
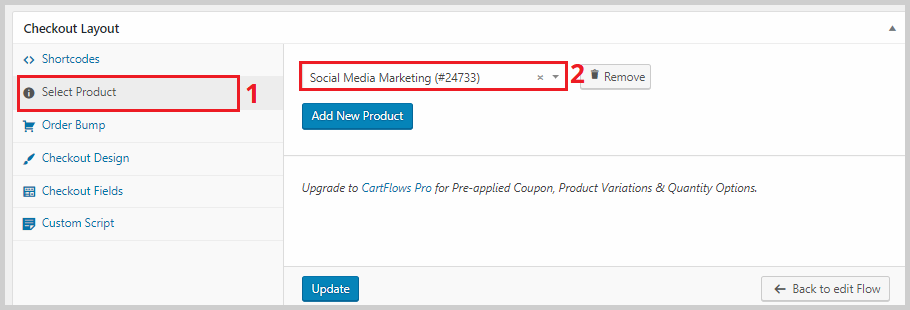
Next, y'all need to link the production that you lot merely made to the checkout page. Edit the checkout page by hovering your mouse over information technology and clicking Edit. Gyre down, and in the Checkout Layout section, click Select a Production. Type the proper noun of the product in the box and select information technology.
You can besides play effectually with the other checkout settings like the design, layout, color, and more. Don't forget to click Update to relieve all your changes.
One time that's done, copy the URL of the checkout page and then become to LearnDash > Courses. Edit the class that you want to connect to the sales funnel that you only created and go to Settings. Curl down to the Access Fashion section and select Closed. Enter the class price and the URL of the checkout page. Striking Update.
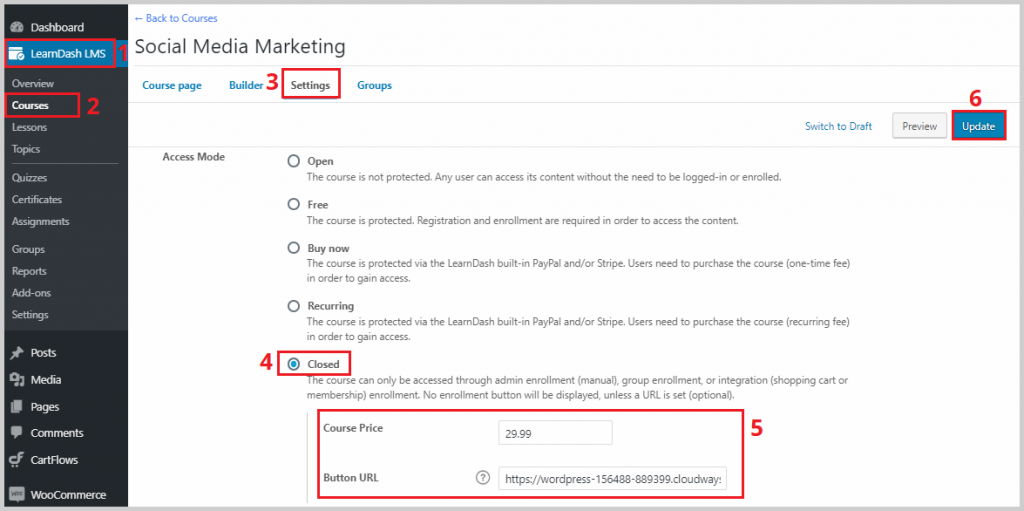
At present, when students purchase this grade, they will be taken to the custom checkout page that y'all created.
Wrapping Upwardly
Now that you have seen how piece of cake it is to create an online course website in WordPress, I hope that you're going to take action and put your content out there. LearnDash empowers everyone, even non-techies, to create beautiful grade websites in just a few hours.
I'm so excited to hear your success stories, and I'k here to answer whatsoever questions you might have.
Source: https://www.wpcrafter.com/how-to-make-an-online-course-website-with-learndash/
0 Response to "Make a Course Avaiable Again on My Courses"
Post a Comment